Web3Auth Integration with Microsoft Authentication

code, arts and earth keeper
After some time of research on how to securely store the private keys, I found out about the web3auth project. They are building a Wallet As A Service product that is non-custodial without the seed phase. You can try the Tor.us wallet at this link https://tech.tor.us/ and see how they split the private key into a social login (like Google, Reddit, etc), a user's device and a private input. And as long as you have 2 of these 3, you will be able to reconstruct your private key.
Please also check out my Key Kiss project to learn more about another way to store the wallet's private key.
In this tutorial, we will integrate web3auth with Microsoft login via Firebase in a Next.js App (typescript). Once authenticated, we'll explore interactions with the Polygon blockchain, demonstrating the integration of secure authentication and blockchain functionality.
Here are the links for the Github and the Web-Demo.
Let's get started with the step-by-step process
Step 1: Set Up Your Next.js App
Start by setting up a Next.js app using TypeScript. Make sure Node.js is installed. Go to your dev directory and run npx create-next-app@latest

Since we will be using the Web No-Modal SDK you need to install the web3auth packages (documentation) and others (web3.js, firebase and dotenv) executing:
cd web3auth-interact (or the name of your project)
npm install --save web3 firebase dotenv @web3auth/no-modal @web3auth/base @web3auth/ethereum-provider @web3auth/openlogin-adapter
Also, the Github Repository can be cloned with the command
git clone https://github.com/rtomas/web3auth-interact.git and then npm install
Step 2: Configure Firebase
Navigate to the Firebase Console and click Add project.
After creating it in some very simple steps (you don't need to enable analytics), we would click the web icon (</>) and register our app nickname.
Then you would get some important information. Please check the Github project on how the files could be ordered in different directories so the project information could be stored like this file.
  // /config/firebase.ts
  const firebaseConfig = {
    apiKey: "....",
    authDomain: "web3auth-polygon.firebaseapp.com",
    projectId: "web3auth-polygon",
    storageBucket: "web3auth-polygon.appspot.com",
    messagingSenderId: ".....",
    appId: "......"
  };
Add Microsoft as a "sign-in method" navigating to the Authentication -> Sign-in method -> Add Provider. Firebase would give you the
redirect URLand ask you for theApplication IDandApplication secret, that you'll get in the next step.Get the Firebase API Key inside the project settings and add it to the
.env.localin theNEXT_PUBLIC_FIREBASE_API_KEYfield.
Step 3: Configure Microsoft Entra
Go to https://entra.microsoft.com/ (the product for all identity solutions from Microsoft) to create a new application. It's important to include the Web Redirect URI that you get from the Firebase configuration. After that, you will receive the Application ID and Application secret.
Step 4: Configure Web3Auth
Finally, we would create a project through the web3auth dashboard. The information should be:
Products: Plug & play
Platform: Web Application
Environment: Sapphire_devnet (only for test environment)
Chain: EVM Based Chain
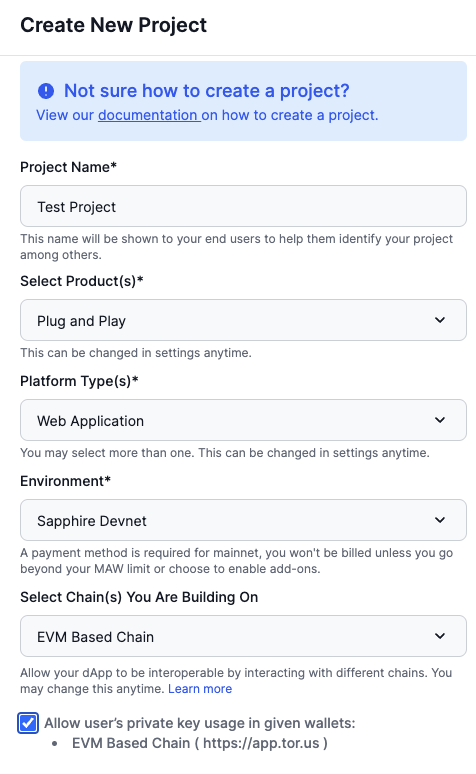
The Client ID must be copied into the .env.local file.
Don't forget to add your web domain to the Whitelist Domain in the project details.
Configure a Firebase Custom Authentication Verifier
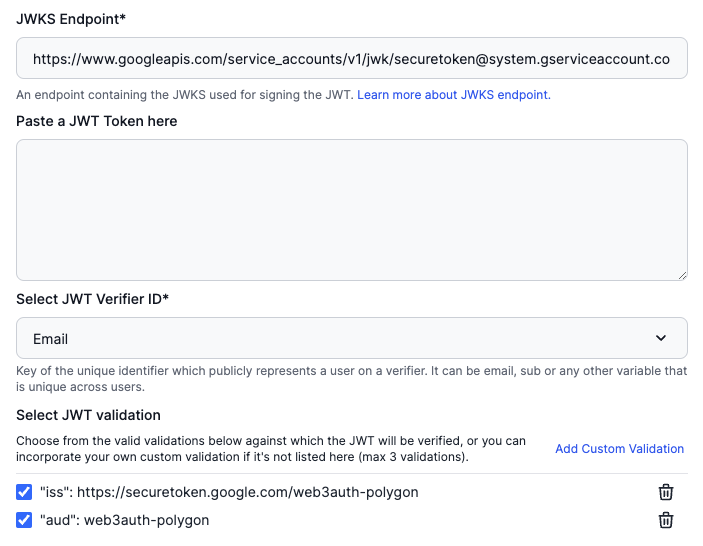
Into the Custom Authentication tab, you can create a Verifier with this information:
Login Provider: Custom Providers
JWKS Endpoint: https://www.googleapis.com/service_accounts/v1/jwk/securetoken@system.gserviceaccount.com
Verifier ID: Email
The following are the JWT validation fields needed for the Firebase JWT validation:
Type
issas a field andhttps://securetoken.google.com/FIREBASE-PROJECT-IDas a value (the name entered to the project).Next, type
audas a field andFIREBASE-PROJECT-IDas a value.
To end the process you need to add the name of the verifier to the .env.local to the field NEXT_PUBLIC_WEB3AUTH_VERIFIER_ID .
Step 5: Implement Web3Auth and Microsoft Authentication
After we pass through the difficult task of configuring the three different protocols, we can start with the code.
When the webpage loads, you would need to initialize the web3auth and notice if it's connected or not. web3AuthConfig and openloginAdapter are variables that get the information from configuration files.
// import configuration files
import { firebaseConfig } from "@/config/firebase";
import { web3AuthConfig, openloginAdapter } from "@/config/web3auth";

...

// conect to polygon testnet network on page load
const initOnPageLoad = async () => {
        // load the configuration file and init the No-Modal SDK
        const web3auth = new Web3AuthNoModal(web3AuthConfig);
        web3auth.configureAdapter(openloginAdapter);
        await web3auth.init();

        if (web3auth.connected) {
            setLoggedIn(true);
        }
};
Also when the button Login is clicked we call the function login()
    // Login with web3auth
    const login = async () => {
        const loginRes = await signInWithMicrosoft();
        const idToken = await loginRes.user.getIdToken(true);

        const web3authProvider = await web3auth.connectTo(WALLET_ADAPTERS.OPENLOGIN, {
            loginProvider: "jwt",
            extraLoginOptions: {
                id_token: idToken,
                verifierIdField: "email",
                domain: domain,
            },
        });

        setProvider(web3authProvider);
    };

   // Call sign-in with microsoft popup through firebase
    const signInWithMicrosoft = async (): Promise<UserCredential> => {
        try {
            // Initialize Firebase
            const app = initializeApp(firebaseConfig);
            const auth = getAuth(app);
            const oAuthProvider = new OAuthProvider("microsoft.com");
            console.log("oAuthProvider", oAuthProvider);
            oAuthProvider.setCustomParameters({
                prompt: "consent",
            });
            // raise the popup to login with microsoft
            const res = await signInWithPopup(auth, oAuthProvider);
            return res;
        } catch (err) {
            console.error(err);
            throw err;
        }
    };

// when the state Provider is changed, we set web3 state to start
// connecting the blockchain
useEffect(() => {
        if (provider != null) setWeb3(new Web3(provider));
}, [provider]);
Step 6: Interact with the Polygon Blockchain
Perform actions such as signing messages, sending transactions, reading from a smart contract, and deploying a smart contract on the Polygon blockchain.
Here are examples of how to read and write to the blockchain, but you can see all the functions in the Github repository or check out the web3auth documentation.
// Read a smart contract and get the value of the counter
    const getCounterValueFromSmartContract = async () => {
        // ABI and Address from the contract are in the config file
        const contract = new web3.eth.Contract(JSON.parse(JSON.stringify(ABI)), counterAddress);

        // Read message from smart contract
        const count = await contract.methods.get().call();
    };
 // Update a state of smart contract, incrementing the counter
    const incrementCounterValueFromSmartContract = async () => {
        // ABI and Address from the contract are in the config file
        const contract = new web3!.eth.Contract(JSON.parse(JSON.stringify(ABI)), counterAddress);

        // change state from a smart contract
        // calling the method inc
        await contract.methods.inc().send({
            from: address,
        });
    };
Conclusion
After using web3auth and trying to build my first app, I realized that this is a great tool to bring new people into the blockchain ecosystem. I thought about a lot of people who want to have an NFT, but don't want to learn how to create and keep their wallets secure. They could start from this point and in the future find a way to continue as they want, but always being the only owner of their assets.
Find the GitHub project here: https://github.com/rtomas/web3auth-interact
References


